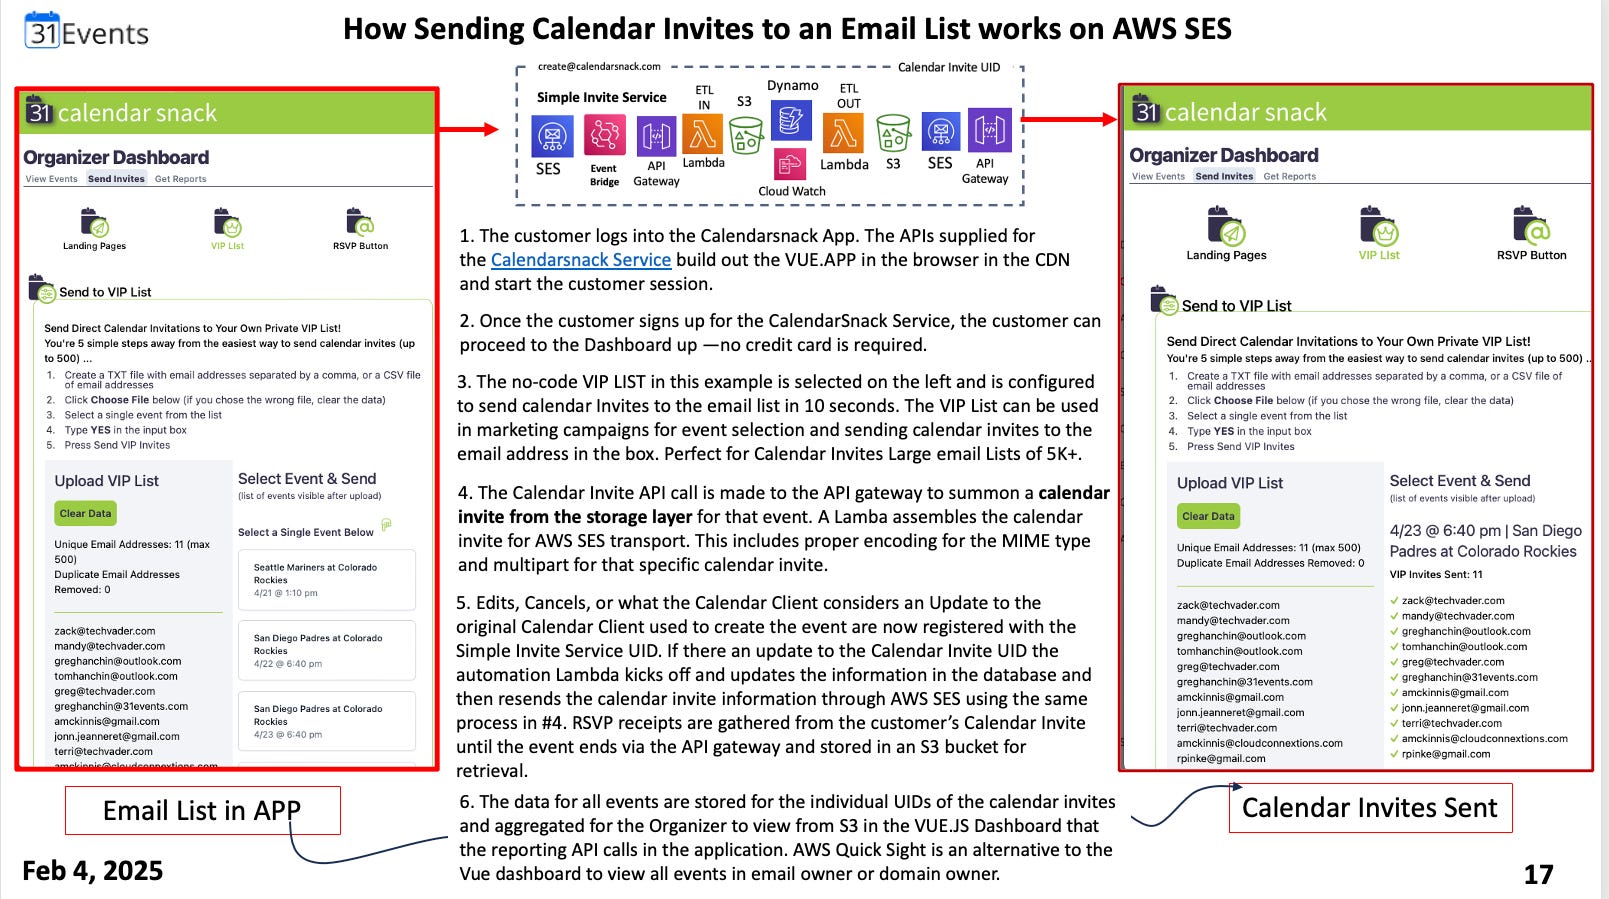
Building the Front End of the Calendar Invite Server
Using the Calendarsnack UI as a starting point

Building the Calendar Snack UI – State Management & Routing
Thanks for reading Calendar Invite Server (CIS) for AWS SES! Subscribe for free to receive new posts and support my work.
Subscribed
In the first article, we focused on the design philosophy behind Calendar Snack: simplicity, ease of use, and making calendar invites accessible to marketers.
Now, let’s take a deeper dive into how the Calendar Snack UI is structured using Vue Router for navigation and Pinia for state management.
A robust state and routing system is crucial for keeping the application fast, responsive, and user-friendly. We’ll walk through:
How Vue Router organizes navigation within the app.
How Pinia stores manage application state, ensuring data availability without unnecessary API calls.
3. How Calendar Snack tracks event invites and RSVPs, providing real-time insights for organizers.
1. Structuring Navigation with Vue Router
One of the first technical decisions in building Calendar Snack was designing an intuitive navigation flow. Because this is a single-page application (SPA), Vue Router is used to handle different pages dynamically.
Primary Routes
The routing structure consists of three primary sections:
Home (/) – The landing page.
Dashboard (/dashboard) – The core app interface, protected by authentication.
Docs (/docs) – Provides FAQs, user guides, and legal documentation.
Additionally, there are dedicated routes for:
Login & Registration
Single Event & Multiple Event Views
Error Handling (404 Pages)
Example Route Definition (Home & Dashboard):
export const routes = [
  {
    path: "/",
    name: 'home',
    meta: { title: "Home", description: "Welcome Calendar Snack" },
    component: Home,
  },
  {
    path: "/dashboard",
    name: 'dashboard',
    meta: { title: "Dashboard", description: "Organizer Dashboard", authRequired: true },
    component: () => import("@/views/Dashboard.vue"),
    children: [
      {
        path: "dashhome",
        name: 'dashhome',
        meta: { title: "Summary", description: "Calendar Snack Dashboard" },
        component: () => import("@/pages/dashboard/DashHome.vue"),
      },
      {
        path: "sendinvites",
        name: 'sendinvites',
        meta: { title: "Send Calendar Invites", description: "Send Calendar Invites" },
        component: () => import("@/pages/dashboard/SendInvites.vue"),
      }
    ],
  }
];
Key Takeaways:
The Dashboard route has multiple child routes (dashhome, sendinvites, etc.).
Authentication (authRequired: true) is handled in application code rather than the router.
Dynamic parameters allow access to specific events (e.g., /event/:eventid).

2. Managing State with Pinia
Vue’s Pinia store is used to persist data across components, reducing unnecessary API calls and improving responsiveness.
Why Pinia?
Pinia is lightweight, modular, and built for Vue 3. It allows centralized state management while keeping the reactivity and performance of Vue's Composition API.
Key State Stores in Calendar Snack
We use four Pinia stores to manage state:
Multiple Events Store (multiple.js) – Manages all events for an organizer.
Multiple Stats Store (multipleStats.js) – Tracks invite stats across all events.
Single Event Store (single.js) – Manages data for a single event.
Single Stats Store (singleStats.js) – Stores RSVP and invite statistics for one event.
Multiple Events Store (multiple.js)
Handles all events associated with an organizer.
export const useMultipleStore = defineStore("multiple", {
  state: () => ({
    orgEmail: "",
    firstUid: "",
    orgEvents: [],
    error: null,
  }),

  getters: {
    getOrgEvents: (state) => state.orgEvents,
    futureEvents: (state) => state.orgEvents.filter(event => event.dtstart > Date.now()),
  },

  actions: {
    async fetchOrgEvents(orgEmail) {
      try {
        const { data } = await apiClient.get(`${orgEmail}/events`);
        this.orgEvents = data;
        this.firstUid = data.length > 0 ? data[0].uid : null;
      } catch (error) {
        this.error = "Failed to fetch events";
      }
    },
  },
});
Key Features:
Fetches all events tied to an organizer’s email.
Filters future & past events dynamically.
Uses Axios for API calls, with error handling.

3. Tracking Invites & RSVPs
Each event in Calendar Snack requires tracking how many invites were sent and how many RSVPs were received. This is handled by two additional stores.
Multiple Stats Store (multipleStats.js)
Tracks RSVP counts and invite analytics across all events.
export const useMultipleStatsStore = defineStore("multipleStats", {
  state: () => ({
    orgEmail: "",
    orgInvites: 0,
    orgRsvp: { accepted: 0, declined: 0, tentative: 0, noaction: 0 },
  }),

  getters: {
    rsvpReceived: (state) =>
      state.orgRsvp.accepted + state.orgRsvp.declined + state.orgRsvp.tentative,
    rsvpNone: (state) => state.orgRsvp.noaction,
  },

  actions: {
    async fetchOrgStats(orgEmail) {
      try {
        const { data } = await apiClient.get(`${orgEmail}/statistics`);
        this.orgInvites = data.attendees || 0;
        this.orgRsvp = data.rsvp || {};
      } catch (error) {
        console.error("Error fetching statistics:", error);
      }
    },
  },
});
Key Features:
Tracks total invitations sent (orgInvites).
Stores RSVP responses (accepted, declined, etc.).
Allows for real-time reporting on invite success rates.
4. Handling Single Event Data
A similar setup is used for single event data (single.js) and single event statistics(singleStats.js).
Single Event Store (single.js):
Loads details for a specific event using a uid.
Provides faster access to event details without refetching data.
Single Event Stats Store (singleStats.js):
Tracks RSVP responses for one event.
Provides summary stats on who accepted, declined, or didn’t respond.

Final Thoughts
The combination of Vue Router and Pinia Stores ensures that Calendar Snack is fast, scalable, and user-friendly.
Vue Router provides clean navigation, keeping routes simple and logical.
Pinia Stores ensure state persistence, reducing unnecessary API calls.
Separation of multiple & single event data makes the app modular and efficient.
In the next article, we’ll explore the frontend UI components that bring all this data to life. We will start to see how we leverage the Event Array data, and start applying various sorting and filtering functions.
In addition to the Events Array, we will step through the various pre-built pages for Sending Calendar Invites, including landing pages for both All Events and a Single Event. This discussion will also include how we leverage Personalization Merge Codes to create our RSVP button.